
If you keep losing scissors or digging through bins for one spool of thread, your craft space is working against you. A good craft room does not need more square feet, it needs a smarter layout and storage that fits how you actually create.
This list pulls together real sewing rooms, vintage nooks, Ikea walls, carts, and closets that work hard in small homes and big hobby rooms. You will see how pegboards clear a desk, how plastic drawers and bins look intentional with color and labels, and how a whole craft room set up can hide in a closet, cabinet, or slim wall.
Use these ideas to match your space type, whether you have a corner, a single wall, a closet, or a full hobby room. Pick one move that fits your budget, like a pegboard, a rolling cart, or a plastic drawer refresh, and build out from there so every glue stick and fat quarter has a clear home.
Cozy Vintage Sewing Nook That Fits in a Spare Corner
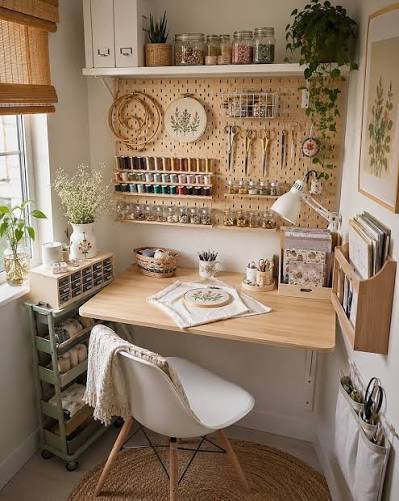
A tiny corner can act like a full sewing room if you build the setup up the wall instead of out into the floor. This nook keeps the footprint to a chair, a floating wood desk, and a round jute rug, but still has thread, tools, and trims all within arm’s reach.
The wall-mounted desk works because it keeps the leg area clear for your feet and a small rolling drawer cart, and you can pick a narrow depth so it does not crowd a shared bedroom or office. Aim for a desk just deep enough for your machine and an embroidery hoop, then let the wall do the rest of the storage work.
A framed pegboard over the desk holds scissors, hoops, tape, and small tools so the work surface stays open for fabric. Add thread racks right on the pegboard and group spools by color families so you can spot the shade you want in seconds instead of digging in bins.
Use the higher wall space for the pretty but less-used items. Glass jars of ribbon, trim, and buttons on a simple wood shelf read as vintage decor, while a trailing green plant and botanical art soften all the hard edges of tools and racks.
If your nook shares space with a guest bed or sofa, mark off the craft zone with a small round rug and a chair that you actually like to sit in for an hour. A clip-on task lamp and a wall file pocket for patterns or notebooks finish the setup and keep this tiny corner feeling like a real sewing studio, not a random pile of supplies.
Rainbow Sewing Wall Using Modular Ikea‑Style Storage
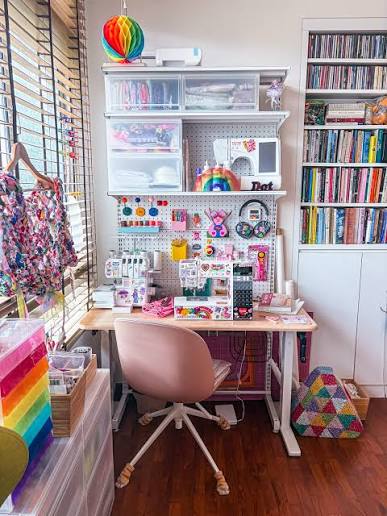
A full sewing room can live on one wall if you treat it like a little storage puzzle. This setup keeps the sewing machine and serger side by side on a plain white desk, so every stitch job happens in one spot instead of across the room.
The real power move is the pegboard over the desk. Scissors, tape, thread spools, and clips hang where your hand can grab them, which keeps the work surface clear for fabric instead of clutter.
Above that, clear‑front bins and drawers hold fabric, yarn, and mystery projects that used to hide in tubs. You can see the contents at a glance, which means you stop buying the same fabric twice because you forgot you had it.
The tall shelf on the side stretches storage up the wall so a small room can hold a big hobby. Patterns, craft books, and magazines stand upright, so you can pull one out like a file instead of digging through a stack.
What keeps all this storage from feeling messy is the rainbow color story. Thread, papers, and bins fall into loose color groups, so the wall looks playful and planned even though it holds a lot.
To copy this in your room, start with a simple desk, a pegboard kit, and two or three clear bins. Add a tall shelf or bookcase later, then layer in rainbow order as you go instead of buying everything at once.
If your wall space is tighter, keep the same idea but scale it: a shorter desk, one pegboard panel, and a single column of bins stacked up. A rolling swivel chair helps you slide between machines and shelves so even a narrow craft wall feels easy to use.
Pastel Pegboard Strip for Tiny Craft Desks
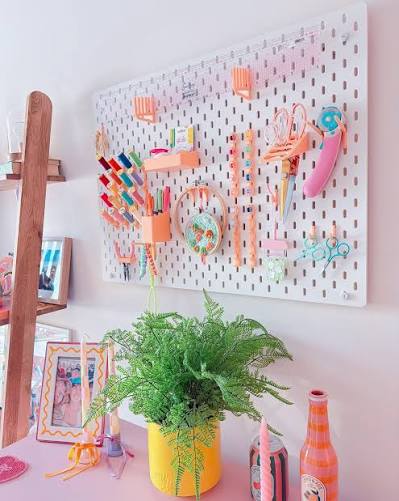
A skinny pegboard strip turns that dead space above a desk into the main tool zone. This works well in tiny craft corners because the tools sit at eye level and the desktop stays free for the actual project.
Here, the white pegboard holds peach and pastel cups, hooks, and mini shelves for scissors, pens, washi tape, and rulers. The color match makes the board look like a planned feature, not a last‑minute fix.
Copy the idea by cutting a pegboard to the same width as your desk and hanging it so you can reach every hook while seated. Use the lowest row for your everyday tools and keep rarely used items higher up.
To keep your brain calm, group by type: all pens and markers in one cup, cutting tools on one row of hooks, and tapes on a short shelf. Your hands start to reach for the right spot on their own, which speeds up every project.
Limit the desktop to one plant, like the bright green fern in a yellow pot, and maybe a couple of pretty bottles or a photo. A mostly clear surface makes the whole corner feel larger and keeps new clutter from building.
If you rent or worry about holes, mount the pegboard on a light backing board and hang that with removable strips. Start with just a few hooks and cups, use the desk for a week, then adjust the layout until it actually fits how you craft.
Rolling Vinyl Cart For Cricut & Cutting Supplies
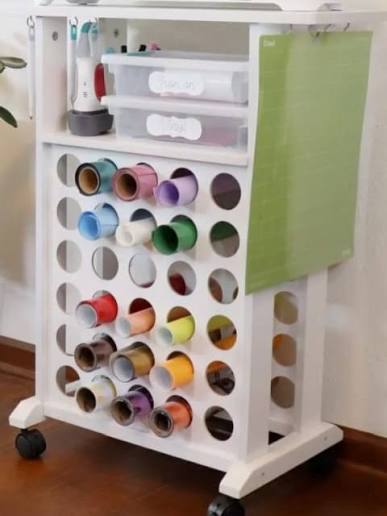
A slim rolling cart like this turns all your vinyl and Cricut tools into a tiny “print shop” that follows you around the room. The cart in the photo holds colorful rolls in a front panel with round cutouts, so every color stays upright, visible, and easy to grab.
This works well in small craft rooms because you keep vinyl, tools, and mats in one narrow footprint instead of spreading them across shelves and drawers. The shallow top tray holds everyday tools like weeding picks, scrapers, and pens, while two clear drawers catch loose bits, extra blades, and transfer tape scraps.
To copy the vinyl front, you can repurpose a plain cart and add a DIY face panel: cut holes in thin plywood or foam board, screw or zip‑tie it to the frame, then sort rolls by color family. If that feels too involved, use tall cans, cereal containers, or narrow bins in the bottom section to keep rolls standing.
Side hooks for cutting mats keep them flat and off the floor, which saves space and stops curling. If your cart does not have a rail, stick on adhesive hooks or clip binders through the mat holes and hang them on a simple S‑hook.
Labels on the clear drawers make this tiny cart feel like a real system, not a junk zone. Use a label maker or painter’s tape to mark drawers for things like “blades,” “scrap vinyl,” or “transfer tape” so you can reach in and grab what you need mid‑project.
The real magic is the wheels. Roll the cart right next to your Cricut while you cut, then tuck it beside a desk, into a closet, or in a hallway corner when you need the room for something else.
Dreamy Ikea Drawer Wall With Framed Pegboard Center
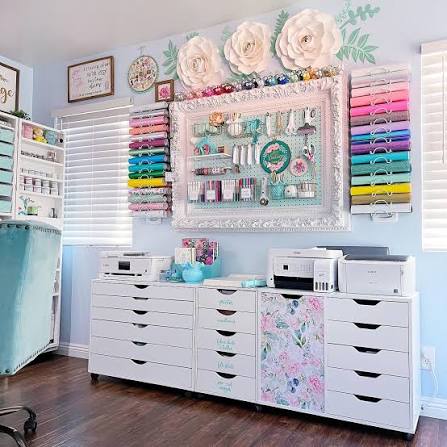
If you work with vinyl, paper, or card stock, a full drawer wall like this keeps every sheet flat and dust free while still close at hand. The row of low white drawer units acts like a long workbench, so you get storage and a clear surface for cutting machines in the same footprint.
What makes this setup special is how practical pieces feel pretty. The framed pegboard turns scissors and punches into a display instead of a cluttered tool zone, and the rainbow vinyl racks on each side double as color storage and wall art.
You can copy this on any budget with a mix of Ikea Alex style drawers, secondhand flat files, or even cheaper office drawer units lined up in a row. Keep the drawer fronts all the same color so the wall looks calm, then let your supplies and decor carry the personality.
If you want a softer, more personal feel, steal the idea of a single patterned door front. One cabinet covered in floral wallpaper or peel and stick vinyl gives the wall a custom look without the cost of new furniture.
The large white paper flowers over the frame add height and make the storage wall feel like part of the room, not a stockroom. You could swap in 3D paper stars, yarn pom garlands, or a painted quote if flowers are not your style.
For layout, treat this wall as your “tiny warehouse” and park your cutting machines and printers on top, spaced out like in the photo. Give each machine its own spot with outlets nearby so you do not have to shuffle heavy gear every time you craft.
If you have windows, place the storage wall between them like this room does. Natural light keeps colors true when you sort paper and vinyl, and the blinds help you cut glare when you work on the counter or desk across from it.
All‑in‑One Craft Closet That Opens Into a Mini Studio
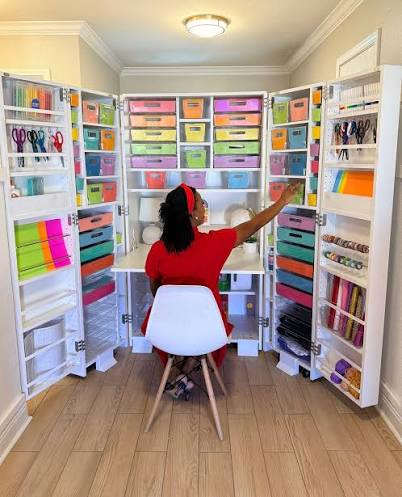
This cabinet works like a whole craft room in a box. The doors open and suddenly you have a desk, a wall of supplies, and a little “studio” that still fits along one wall in a hallway or guest room.
The setup feels calm because every shelf repeats the same style of plastic bins in bright colors. Color helps your brain remember where things live, so you can decide that pink is for paper, blue is for paint, green is for vinyl, and reach for the right bin without thinking.
The smart move here is the shallow built‑in desk in the middle of the cabinet. It keeps you seated inside the storage zone, so you can grab scissors or a bin with one small reach instead of getting up and down all afternoon.
Both inside doors work like bonus walls. Narrow rails and skinny shelves on the doors hold scissors, tape, and rolls of vinyl where they stay visible but do not steal shelf depth from the main cabinet.
You can copy this with almost any wardrobe or large armoire. Add a simple board or ready‑made shelf bracket as your desktop, then keep shelves tighter at the top for light bins and a bit taller at the bottom for heavier tools.
If you rent or share space with a dining table, this style is friendly. You can place the cabinet in a living room or office corner, pull out a simple chair when you want to craft, and then shut the doors to hide visual clutter when company comes.
To adapt on a budget, skip custom inserts and start with what you have. Line up matching plastic shoe boxes or dollar‑store bins, add plain labels, and upgrade later to prettier containers once you know what sizes you reach for most.
If the inside feels dark, clip in battery puck lights under the top shelf so the work surface stays bright. Aim to store the tools you touch every day at eye or hand level, and leave only backup stock on the very top shelf.
Vertical Rainbow Craft Cabinet With a Pull‑Out Desk
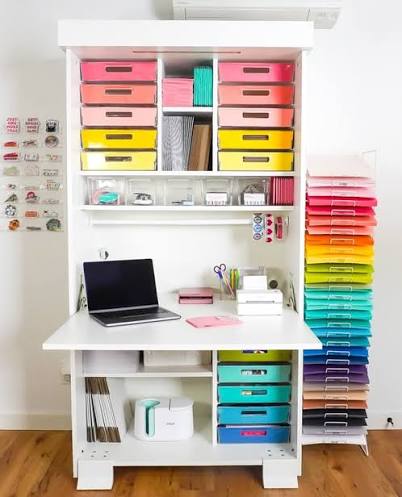
This tall white cabinet packs a full craft room into one slice of wall, which is ideal if you share a bedroom, office, or living room. The pull‑out desk holds a laptop or cutting mat, and the rest of the time it slides away so the unit feels like one clean tower.
Color‑coded bins do the heavy lifting here. Matching boxes in pink, red, orange, yellow, green, blue, and teal keep the look neat, but the color shifts tell your brain where each craft lives so you grab the right bin fast.
You can copy this with any tall bookcase or Ikea‑style cabinet. Add a fold‑down table leg or a simple pull‑out shelf board at sitting height, then use it as your only work surface for both crafting and computer work.
Keep the desktop almost empty so you can switch tasks in seconds. Store cutters, glue, and scissors in one clear container on a shelf above, and only bring them down when you start a project.
The lower shelves hold bulky machines and bigger boxes, which keeps the visual weight low and your sightline calm. Put your cutting machine and heavy tools here so you can slide them forward to use, then push them back when you need leg room.
The rainbow paper rack on the right keeps cardstock flat and easy to flip through, which protects edges and saves you from digging through drawers. If you use vinyl, felt, or scrapbook paper, a slim vertical rack like this fits beside almost any cabinet.
To stretch storage without adding more furniture, copy the thin wall system on the left side. Mount clear pockets or stamp sleeves on the nearby wall for dies, stamps, or stickers so every flat surface still feels open and you only use a single footprint on the floor.
Closet Craft Station With Door-Mounted Organizers
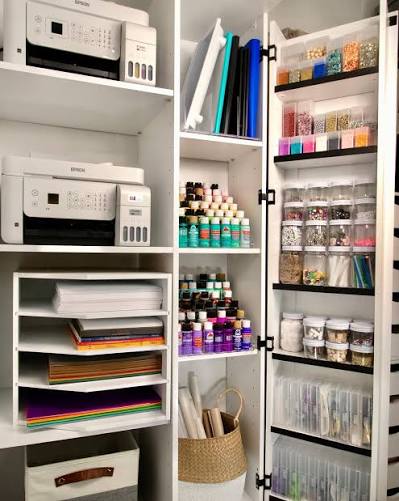
A plain closet can hold a full craft room set up if you treat every inch like storage, not just the floor. This works well in bedrooms, hallways, and offices where you need to shut the doors and hide the mess between projects.
Start with strong shelves across the back wall. Keep your printers or cutting machines on their own shelves so you can slide them out and use them without lifting. Use the other shelves for color coded cardstock stacks and one full shelf of acrylic paints with the labels facing out so you can see shades at a glance.
Small supplies stay under control when you give them clear limits. Line up jars and clear bins in a single row per shelf so you do not lose beads and buttons behind each other.
The secret upgrade here is the inside of the door. Door mounted clear bins or pockets hold glitter, stamps, dies, and tiny tools you reach for often. You can see everything in one swing of the door instead of digging in a drawer.
Use the skinny spots for bulky items that never sit right on a flat shelf. A tall basket in a vertical cubby keeps rolled paper or vinyl upright and easy to pull. Tuck backgrounds or poster board beside it so nothing curls.
To plan your own closet craft hub, measure the interior, then sketch layers of storage: deep shelves for machines, mid shelves for paints and paper, and door racks for smalls. Once the layout works, you can add cute labels or matching baskets over time, but start with making every item a clear, reachable home.
Turn One Wall Into a Sewing & Craft Command Center
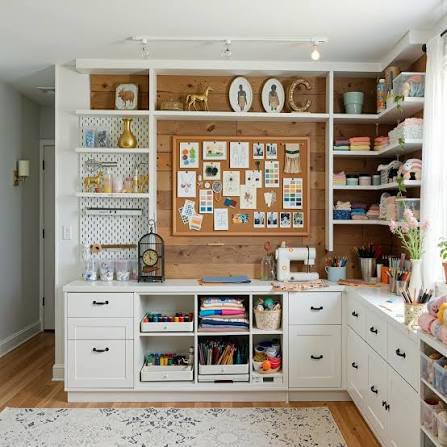
If you can give one full wall to your hobby, you can treat it like a mini craft warehouse instead of scattering supplies all over the house. A long counter with storage above and below keeps sewing, cutting, and gluing in one place so you use the space more and clean up faster.
This setup uses a continuous countertop so the sewing machine, cutting area, and general craft zone all share one smooth surface. You can copy that with a run of stock kitchen cabinets, office bases, or even sturdy tables pushed together, then top them with a simple laminate or wood counter.
The mix of closed drawers and open cubbies keeps the wall calm while supplies stay handy. Drawers hide tools, cords, and odd bits, while the open cubbies under the counter hold bins of fabric or paper that you can grab mid‑project.
Above the counter, a huge corkboard in the center turns the wall into a planning hub. Use it for pattern pieces, color swatches, sketches, or a running list of what you want to sew next so your ideas do not live in piles on the desk.
The open shelves on the side work hard because the owner stacks color‑sorted fabric and jars in plain view. You can do this with simple brackets and boards, then sort fabric, yarn, and trims by color so they act like decor and also make it easy to see what you are low on.
On the right, clear plastic drawer towers tuck in like part of the built‑in and give tons of budget storage. To copy this, slide plastic drawers up against your cabinets, line the tops with the counter height if you can, and label each drawer by craft type so they feel planned, not random.
Good light makes this wall work for long sewing sessions. Aim for a window nearby if you have one, then add track or rail lighting plus one small task lamp near your machine so your eyes stay happy at night.
A simple neutral rug under the counter softens the wood floor and marks this wall as a hobby zone. Pick something flat‑weave so chairs roll easily, and use it to visually anchor your command center even if the room also works as a guest room or office.
Pretty Multi‑Use Corner With Hidden Craft Storage
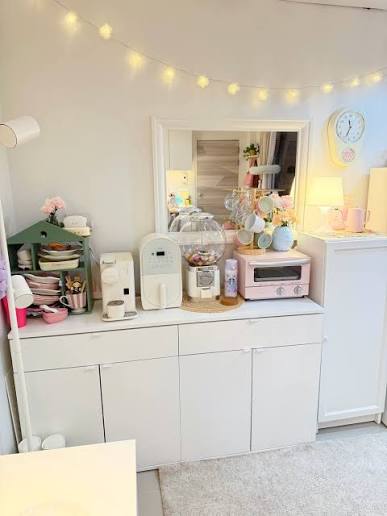
This setup looks like a sweet coffee corner at first, but that run of flat white cabinets can hide a full craft stash. It works well in living rooms, bedrooms, or tiny studios where you want craft supplies close by but do not want to stare at bins and tools all day.
The smooth, handle free doors keep the wall calm so your eye lands on the soft decor instead of visual clutter. Inside the cabinets, you can use clear bins for fabric, small drawer units for thread, and labeled boxes for paints so it functions like a real craft room.
On the counter, the owner groups the pink appliance, jars, and mugs on a round wooden tray, which makes the mix of items feel tidy. You can swap those for a sewing machine, a few pretty jars of buttons, or a washi tape stand and still keep the same contained look.
The leaning mirror and light rug bounce light around and make this small corner feel bigger. If your craft zone sits in a dark corner, copy that trick and add a mirror behind your machine or trays to keep the area bright.
String lights draped over the mirror create a soft frame, so your eye reads this as a cozy nook instead of storage. If fairy lights are not your style, you can use a simple picture light or a small table lamp to give the space a warm glow at night.
To adapt this at home, start with one or two basic cabinets or even a low sideboard. Keep the outside simple and stick to one soft palette so it blends with the rest of the room, then go wild with bins, dividers, and labels on the inside where only you see the chaos.
Vintage Craft Wall With Thrifted Hutch & Rainbow Drawers
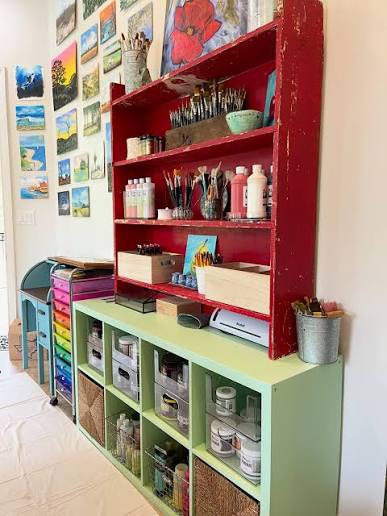
This setup looks like a tiny art store, but it uses simple pieces you can actually find: a pale green cube shelf on the floor, a thrifted red hutch on top, and a rainbow drawer cart off to the side. The stacked furniture gives you a full storage wall without custom built‑ins, and the mix of old wood and clean cubes makes the space feel warm and collected instead of like a plastic bin zone.
The cube shelf on the bottom holds the heavy stuff, like paint cans, jars, baskets, and boxes, so the weight stays low and the unit feels solid. You can copy this with any 8‑ or 9‑cube organizer, then use a mix of open cubbies for daily paints and closed baskets to hide bulk glue, paper, and random tools.
The distressed hutch on top turns small items into a mini shop wall. Jars of brushes and bottles of paint sit at eye level, so you grab what you need fast and see what is running low before you start a project.
To adapt this at home, hunt for a low cube unit first, then measure an old bookcase or hutch to make sure it fits and feels stable on top. Put the taller piece against a wall, use furniture straps if you can, and keep the heaviest supplies in the bottom cubes so the whole stack stays grounded.
The rainbow drawer cart on the side works as your color‑coded brain. You can sort by color for kids crafts, by medium for mixed media (markers, pastels, inks), or by project type so each ongoing project has its own drawer you can wheel to the table.
A small printer or cutting machine on the lower shelf keeps tech handy but out of your main work zone, which frees up table space for messy paint or paper work. If you craft in a shared room, this makes clean‑up faster, because every category has a clear home you can roll or slide back into place.
The art gallery wall near the storage turns this wall into a tiny studio instead of a supply closet. Pin up your own sketches, color swatches, or kids art beside the hutch, and use that slice of wall as a rotating board you change when a new project starts.
Build a Wall‑to‑Wall Craft Warehouse With a Fold‑Down Worktable
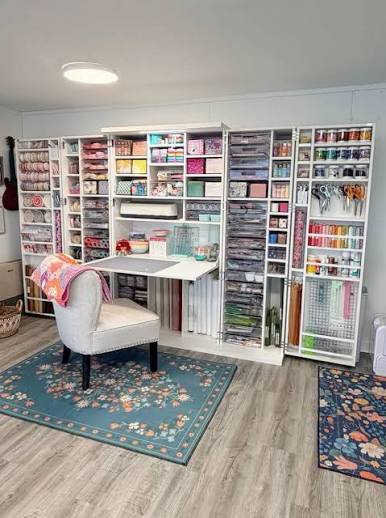
If you dream of a “tiny warehouse” for your supplies, a full wall of modular storage keeps everything in one place instead of scattered across the house. This kind of layout works well in a hobby room or guest room because it reads as one clean unit when the table folds away.
The storage wall in the photo uses white shelves and cubbies packed tight with bins, paper stacks, ribbons, and paints, but it still feels calm because every item has a clear zone. Treat each shelf like a mini store section: one row for paints, one for paper, one for ribbon, one for tools.
A fold‑down table built into the wall unit is the real space saver here. You flip it up when you need to cut, glue, or plan, then close it so the room can go back to home office, playroom, or guest space.
Tall, narrow vertical cubbies on one side store wrapping paper, cutting mats, and rolls upright so they do not crease or slide behind a dresser. If your system is shorter, you can fake this with a tall umbrella stand or a skinny trash can tucked beside the shelves.
Clear containers and labeled bins make this wall feel busy but still organized because you can see what you own at a glance. Use the same color or style of bin across each row so the whole wall looks planned, even if the supplies inside are bright.
A cozy upholstered chair in front of the table makes this feel like a real studio, not a garage shelf. Pick a chair you would use in a living room so you stay comfortable for long sewing or crafting sessions.
Two floral area rugs sit under the work zone and soften the hard flooring. If your craft wall lives in a cold or echoey room, a washable rug will warm it up and also catch stray beads and pins so they do not roll away.
To adapt this idea on a budget, line up basic bookcases or Ikea‑style shelf units along one wall, then add:
- A wall‑mounted drop‑leaf table or shallow fold‑down desk
- A few tall containers for rolls and cutting mats
- Matching bins or boxes for the categories you reach for most
Keep daily tools at arm’s reach near the center of the wall, and move seasonal or rare supplies higher or lower. Start by building one “column” of this setup, live with it for a month, then copy the parts that truly help before you add more units.
“Tiny Warehouse” Craft Wall With Chic Matchy Bins
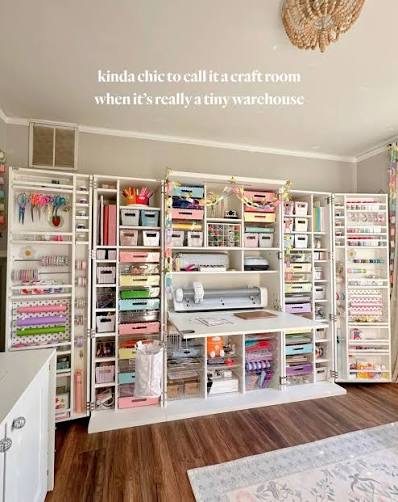
This kind of storage wall works like a tiny warehouse that actually looks cute in a spare room or office. The nearly floor to ceiling unit uses all white shelving and bins, so the wall feels calm even though it holds a huge amount of stuff.
The central fold out work surface keeps your big cutting or vinyl machines right in the middle, with cords and tools contained in one zone. You pull the table out when you craft, then fold it away so the room can go back to guest room or office mode.
Narrow side towers are gold for tiny supplies. Fill shallow shelves with ribbon spools, tapes, punches, glue, and small tools so you stop losing them in deep bins.
If you build your own version, pick one main color for the system, like white or light wood, and stick to it for shelves, boxes, and magazine files. Then label every bin in plain language you use in real life, such as “cardstock,” “vinyl scraps,” or “gift wrap,” so you can shop your own wall fast.
To keep it cozy, copy the soft touches: a simple rug under the pull out table, warm wood look flooring (or a vinyl rug), and string lights across the top of the wall. This helps the setup feel like a creative studio, not a storage unit, even when you pack it full.
Hyper‑Organized Bead & Jewelry Station on One Wall
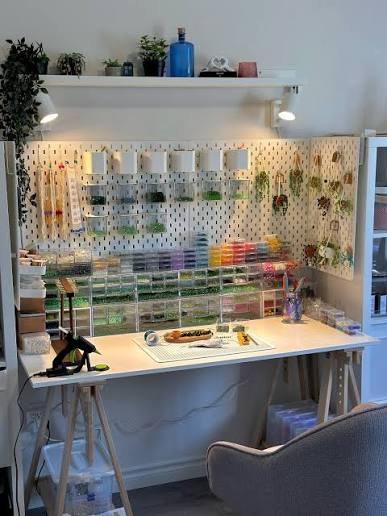
A single wall can hold a whole bead or jewelry station if you keep everything shallow and vertical. This setup uses a slim light wood desk, clear drawers, and a pegboard so every tiny piece has a home.
The narrow desk on simple legs keeps the floor open, which matters a lot in a bedroom or shared office. You still get a full work zone, but the room feels like a normal space, not a storage unit.
The pegboard panel behind the desk carries the weight of the mess. Small clip‑on bins and hanging cups hold pliers, scissors, and packets so they sit in easy reach instead of sliding around the desktop.
Clear drawer units lined across the back of the desk are the real hero for beads and findings. You see every color and size at a glance, so you grab what you need fast and you stop buying duplicates.
The white shelf above the pegboard catches overflow boxes and props, and the plants soften all the plastic and grids so it still looks nice in a main room. If you share the space with work or guests, that little bit of decor makes the wall feel more like a styled nook than a hardware store.
Under‑shelf spotlights give bright, direct light on detailed work, which saves your eyes and keeps colors true. If hardwiring feels too much, use clip‑on lamps along the shelf to get a similar effect.
To adapt this at home, start with:
- One shallow desk or tabletop fixed to the wall
- A pegboard cut to match the desk width
- A few rows of small clear drawer units
Treat your desktop like a work tray, not storage. Keep only your current project there and train yourself to drop each bead, charm, or clasp back into its labeled bin as soon as you stop for the day.
Copy This Ikea‑Style Mini Sewing Station For Small Apartments
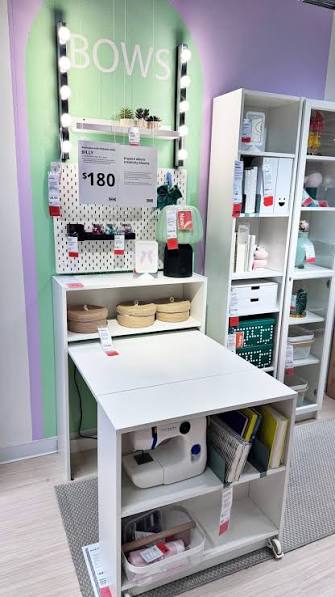
This little showroom station proves you can fit a real sewing room into a shallow slice of wall. The narrow console, pegboard back, rolling cart, and tall shelf act like one tiny warehouse that still works in a rental.
The console table keeps your work surface slim, so it fits behind a sofa, in a hallway, or along a bedroom wall. When you add a pegboard back, you turn that thin table into a full storage wall without eating floor space.
Hang your scissors, rulers, ribbon, and small tools right on the pegboard so they sit in front of your face while you sew. Use hooks and small cups instead of deep drawers, so you see what you own and stop buying doubles.
The rolling cart under the station holds the sewing machine and fabric stacks on open shelves. You pull it out when you sew, then roll it into a corner or closet when you want the room to look calm.
A tall white shelf to the side handles the bulk items that always sprawl in a hobby room. Fill it with stackable boxes and bins, and give each shelf a simple job like fabric yardage, interfacing, gift wrap, or kids crafts.
Bright, vanity‑style lights around the pegboard turn this into a mini studio, even in a dim apartment. If you cannot hardwire, clip on plug‑in task lights or a light strip around the board so you can thread needles and match thread at night.
To make the area feel like a real station and not random furniture, lay a small rug under the cart and stool. Add one fun detail, like a painted panel or word art sign, to mark the craft zone and remind you that this slim setup is a real, working sewing room.
Conclusion
Any home can hold a real craft room if you match the layout to the space you have and give every supply a simple home. A corner can work with a slim desk and pegboard, a closet can shine with shelves and door racks, and a full room can feel calm with drawer walls, rolling carts, and color sorted bins.
The strongest ideas here repeat: use vertical pegboards, clear or labeled bins, rolling storage, and closets or cabinets that close when you want a tidy room. Pin or save the setups that match your space type, then start with one upgrade, like a pegboard strip, a labeled cart, or a plastic drawer makeover, and tweak it until the system fits how you craft.
Once your tools are easy to grab and easy to put away, you can layer in the fun parts like art, plants, and pretty jars. Give yourself one weekend to set up the bones of your hobby room, and let every new project be a small test of what to adjust next.