
Fall is a great time to pull out your clay and make a few simple pieces you can actually use. This list is full of beginner friendly fall clay crafts that work for decor, gifts, and quick weekend projects with kids.
You will see ideas for air dry clay, polymer clay, and terracotta, from tiny magnets and earrings to tealight holders and mini forests. Each project notes the skill level, time, and main materials so you can pin it now and pick the one that fits your supplies and schedule.
Keep your favorite ideas on a Fall Clay Crafts board, then batch similar projects like pumpkins, ghosts, or leaves in one sitting. That way you get a whole set of decor or gifts ready before the busy part of the season hits.
Squishy Air‑Dry Clay Pumpkin for Cozy Fall Decor
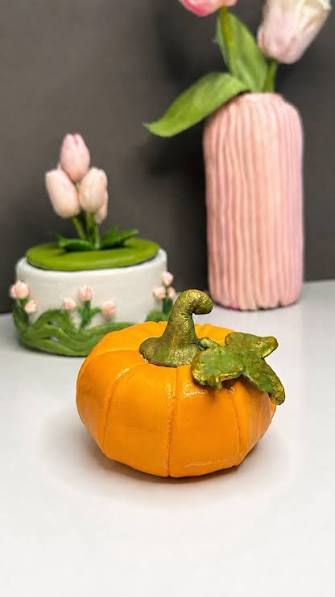
This little pumpkin is a quick win for your fall shelf or tiered tray. It works as a single accent or in a small vignette with other clay pieces, like mini vases or flower pots.
Skill level is beginner, and one pumpkin takes about 30 to 45 minutes of hands-on time plus drying. Kids can help with the shaping while you handle the attaching and painting.
You only need air‑dry clay, a toothpick or butter knife, acrylic paint, and optional gloss sealer. Work the clay into a smooth ball first, then press lines straight down the sides to form the pumpkin ribs instead of trying to build each segment.
Make the stem and leaf as separate pieces so you can play with size and curl. Rough up both joining spots with a toothpick, add a dab of water or white glue, then press them together so they stay put while the clay dries.
Press the base lightly on your table so it has a flat bottom. This keeps the pumpkin steady on mantels, shelves, or tiered trays and stops it from rolling when kids bump the surface.
Once the clay is fully dry, paint a solid coat of bright orange, then dry‑brush darker orange into the grooves and a bit of yellow on the raised areas. Finish with a glossy sealer if you want that shiny, almost ceramic look that stands out against dark or neutral backdrops.
To adapt this idea fast, mix a few sizes in one sitting and change stem colors for each. Save the project idea to a fall board and batch a whole mini pumpkin patch the next time you open your clay.
Palm-Sized Polymer Clay Pumpkin Charms
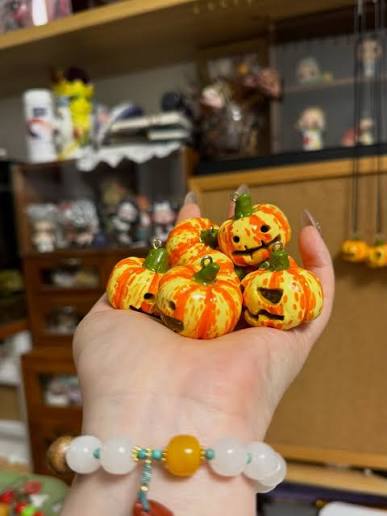
These tiny polymer clay pumpkins are great for keychains, zipper pulls, or a small bowl of fidgets on your desk. Each one fits in your palm, so a little ball of clay goes a long way for fall gifts and Halloween trades.
Use orange and yellow clay twisted together to copy that streaky, variegated look. Condition the clay first by rolling and folding it until it feels soft and smooth, which helps keep those color streaks and segment lines from cracking in the oven.
Shape a small ball, then press vertical lines with a toothpick or needle tool to hint at pumpkin segments. Work gently so you keep the round shape and do not squish the sides flat.
For jack-o-lanterns, press tiny triangles and mouths with a sharp tool, or paint faces on after baking with acrylic paint. Mix happy, grumpy, and surprised faces so a full handful looks fun and varied, like the mix in the photo.
If you want real charms, push an eye pin or loop of wire into the top before baking. Leave just the loop peeking out so you can add jump rings later for earrings, phone charms, or bag pulls.
Bake small pumpkins on plain tile or cardstock so the bottoms stay matte and round instead of shiny or flat. This project is beginner friendly, takes about an hour plus baking time, and works well for older kids as a Halloween clay night project.
Textured Terracotta Clay Acorn Garland
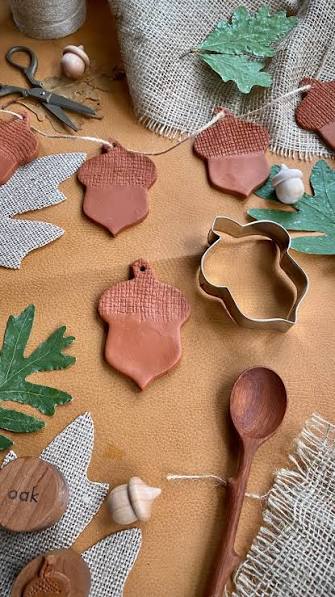
This terracotta acorn garland is a simple fall clay project that looks handmade in the best way. You can hang it on a mantle, across a shelf, or tie single acorns onto gift bags as reusable tags.
Use air dry clay for this so you skip baking and can craft with kids. Skill level is easy, and you can finish a full strand in about 1 to 2 hours plus drying time.
Roll your clay between two equal rulers or paint sticks so each acorn has the same thickness and dries at the same speed. This also keeps your garland looking neat when all the pieces hang side by side.
To copy the woven look on the acorn tops, press a scrap of burlap or lace into the clay before you cut the shape. Lift the fabric straight up so the pattern stays crisp and does not smear.
A simple acorn or pumpkin cookie cutter makes this very beginner friendly and fast for batches. It works well for classrooms or if you like to assemble long garlands for windows, stair rails, or market booths.
Punch a small hole at the top of each acorn with a skewer or straw while the clay is soft. The clean holes make it easy to thread through twine or thin ribbon later without cracking the clay.
Once the pieces dry fully, brush on a matte varnish if you plan to hang them in a kitchen or bathroom where there is more moisture. String them on jute twine for a rustic look, or on thin satin ribbon if you want them to double as simple place cards on fall table settings.
Leaf-Imprinted Clay Trinket Dishes for Autumn
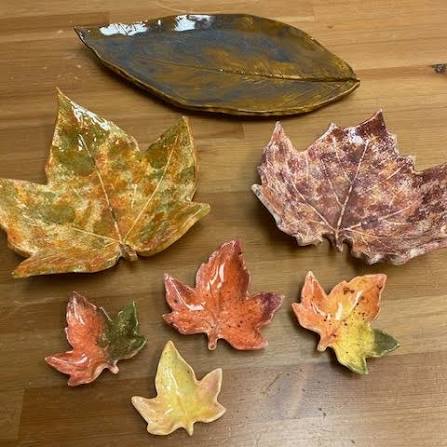
This project turns real leaves into handy trinket dishes for keys, rings, or soap, so you get decor that actually works in your home. The big leaf trays on the table are great by the entry, while the smaller ones fit on a dresser or bathroom shelf.
Skill level is beginner friendly, since you only roll, press, cut, and shape the clay. Plan about 45 to 60 minutes of hands-on time, plus drying or baking.
Use air dry clay for an easy weekend craft, or polymer clay if you already bake clay pieces. Roll the clay, press real leaves into the surface so the veins show, then cut around the leaf shape with a craft knife or needle tool.
To make that shallow bowl shape, lay each clay leaf over an upside-down bowl or a nest of crumpled foil so the edges curve up while it dries. This step keeps your dishes useful instead of flat.
Paint or glaze with yellow, orange, brown, and green to echo real fall leaves, and mix colors right on the clay for a mottled look like the green-gold and reddish-brown dishes in the photo. Seal the dry pieces with clear varnish, especially if you want to use them as a soap dish or near the sink.
If you are short on time or clay, pick just two sizes: one larger catchall by the door and one tiny ring dish by your bed. Start with the leaves you can grab in your yard or on a walk, then build a little “forest” of dishes over the season.
Whimsical Clay Toadstools for Your Fall Garden
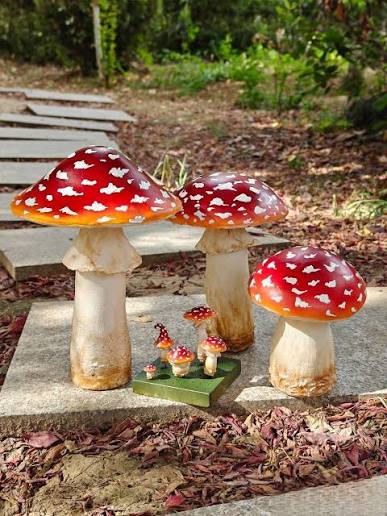
These big red-and-white toadstools turn any corner of your yard into a fairy path for fall. They work well as garden accents or as playful markers along a stone walkway.
For large outdoor pieces like these, build the mushroom around a sturdy center so the clay does not crack or slump. You can press your clay over PVC pipe, a thick wooden dowel, or a plastic bottle to keep each stem strong but still fairly light.
If your mushrooms will sit outside in rain and cold, pick a clay that cures hard and then add outdoor sealer once the paint dries. This extra step keeps the red caps glossy and stops the white spots from fading.
To get that classic toadstool look, paint the caps bright red acrylic and tap on uneven white dots with a small brush or cotton swab. Imperfect spots make the mushrooms feel more storybook and also hide minor dents in the clay.
For a quicker, beginner version, shrink the idea down to air dry or polymer clay mushrooms that fit in a planter or on a desk. One afternoon is enough to shape a few mini caps and stems, let them dry, and add paint.
If you want to try this with kids, let them each design one small mushroom and group the finished pieces on a tray or in a planter. The mix of sizes looks fun, and you only need basic supplies you likely already have: clay, red and white paint, and a simple sealer.
Handbuilt Clay Mug with 3D Toadstool Detail
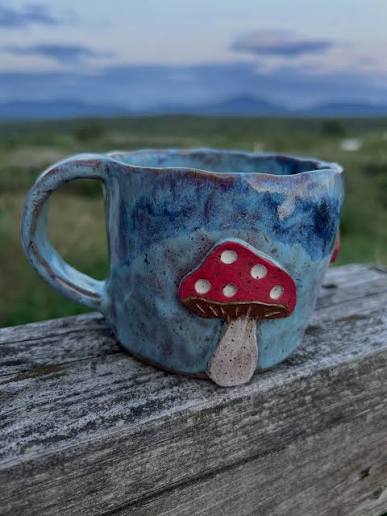
This project makes a cozy woodland mug with a little 3D mushroom on the side, which fits fall so well. The slightly uneven blue mug in the photo shows how a wobbly shape still looks charming and handmade.
Skill level is beginner friendly if you already know basic clay handling. Set aside about 1 to 2 hours for building and decorating, plus drying and firing or sealing time.
Form a simple mug first using a pinch pot or easy slab cylinder, then cut a flat toadstool shape and attach it with score and slip along every edge. Keep the mushroom pretty low and shallow so the mug still feels good in your hand and stays easy to wash.
For color, paint the cap a bright red and add crisp white dots so it pops against a darker mug body. A slightly mottled blue or brown glaze gives an instant forest feel that works well for fall.
If you use air dry clay, treat it as a decor piece instead of a drink mug. Seal it well and use it as a pencil cup, makeup brush holder, or tiny planter on your desk.
Gather what you need before you start:
- Clay (ceramic or air dry)
- Clay knife or butter knife
- Slip or water for attaching pieces
- Underglaze, acrylics, or markers for details
- Clear sealer or glaze
Do not chase a perfect curve on the handle or rim. A slightly off-center handle and a lumpy mushroom cap keep it cute and fast to finish for fall gifting.
Speckled and Floral DIY Clay Ghost Figurines
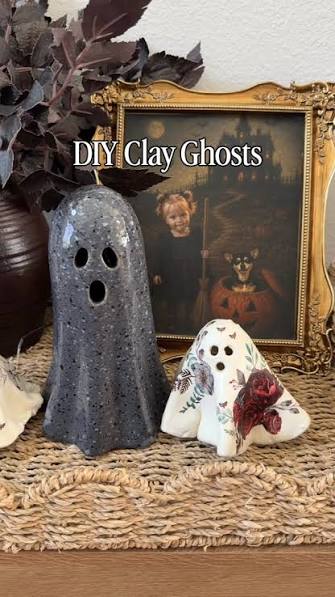
These DIY clay ghosts work as an easy first Halloween clay craft and look cute on a shelf, tray, or mantle. You only need basic tools, and the simple draped shape hides small beginner mistakes.
Use air dry clay if you want a no-bake option or polymer clay if you like a harder finish. Roll the clay, drape it over a small cone or foil ball, then trim the bottom so the hem looks wavy and a bit uneven.
While the clay is still soft, press in the eyes and mouth with a straw or piping tip so the cutouts stay clean. Let each ghost dry fully before you add any paint or sealer so the surface does not crack.
For the tall speckled look, paint your ghost a solid light or dark color, then flick watered-down black or dark brown paint from a small brush for tiny spots. For the floral version, glue thin napkin or tissue flowers onto an off white base with decoupage medium instead of trying to paint tiny petals by hand.
Set a group of ghosts on a woven tray with a vintage frame or dark foliage behind them to get that cozy, spooky corner you see on Pinterest. If you craft with kids, let them shape and cut the faces, then you handle the speckles or floral decoupage as the finishing step.
Spooky‑Cute Clay Ghost Figurine Set with Pumpkins and Witch Hats
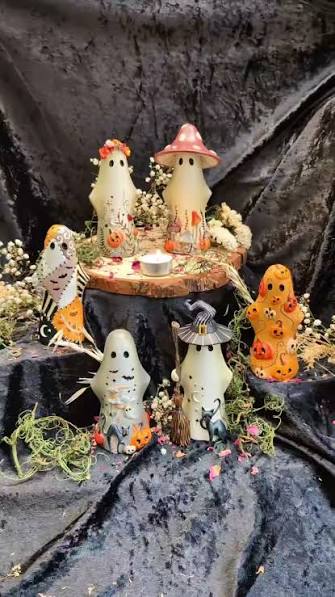
This little ghost crew is an easy win if you want Halloween decor that feels fun, not gory. Each ghost starts as a simple tapered cone of clay with a rounded top, so beginners and kids can shape them fast.
Use air dry clay or polymer clay depending on what you have. Polymer works well for tiny details, while air dry is great for quick kid projects that you can paint the next day.
Keep the faces simple. Two tiny black dots for eyes and a small oval mouth already look expressive and keep the project stress free.
Once you have a few basic ghosts, turn them into characters. Add witch hats, mushroom caps, pumpkin bellies, bats, or stars so each ghost feels like its own little story.
For color, copy what works in the photo: cream ghosts, bright orange pumpkins, and a dark backdrop. This strong contrast makes your ghosts pop on camera and on Pinterest.
To turn them into decor, group your ghosts on a wood slice with a battery tealight in the middle. Tuck in dried moss, tiny pumpkins, or leaves you already have from other fall crafts.
Skill level is beginner friendly and each ghost takes about 10 to 20 minutes to shape, plus drying or baking time. Make a few each evening and you will have a full Halloween village by the weekend.
Tiny Fall Treat Clay Magnets
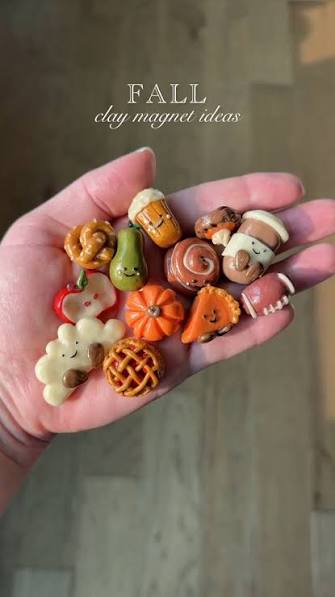
These tiny magnets turn scrap clay into cute fall food friends for your fridge or whiteboard. You end up with little pumpkins, pie slices, mugs, and apples that look fun but use very little clay.
Beginner level is enough here, since each shape is simple and small. Plan about 45 to 60 minutes for forming, then add drying or baking time depending on your clay.
Use colored polymer clay or air dry clay so you do not need to paint every piece later. Roll tiny balls and flatten or pinch them into pumpkins, acorns, pies, candy corn, or a mug with “whipped cream” on top.
Add faces last. A toothpick, needle tool, or fine paint pen makes easy dot eyes and a small smile that gives everything that kawaii look.
Bake or dry the pieces fully, then glue small disc magnets on the back with strong craft glue or epoxy. A quick coat of gloss varnish or clear nail polish keeps fingerprints off and makes the fall colors look bright.
Work on a ceramic tile or glass so tiny pieces do not warp or stick. For a fast set, pick one color story, like orange and cream, and repeat the same 3 designs so you can gift little matching fall sets.
Wavy Gold-Edged Clay Ring Dish
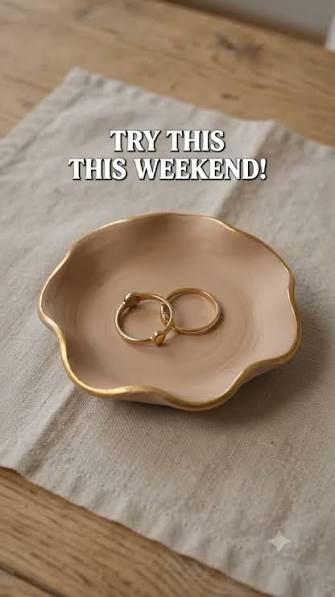
This little wavy dish is an easy weekend project that gives you a useful spot to drop rings or tiny earrings by the sink or bed. The soft beige clay with a thin gold-painted rim fits right into cozy fall decor without needing pumpkins or leaves.
You only need air dry clay, a rolling pin, a craft knife or cookie cutter, fine sandpaper, gold acrylic paint or paint pen, and clear sealer. Beginners can handle this in an afternoon, with drying time added.
Roll the clay to an even slab about the thickness of a coin, then cut a loose flower or scalloped shape so the edges already feel wavy. Lay the shape over the bottom of a small bowl or hold it in your hand and gently pinch sections of the edge up to create that uneven, organic rim.
Let the dish dry fully, then lightly sand the rim so it feels smooth when you pick it up. Paint just the very edge with gold to keep the look simple and modern, and seal once dry if you plan to use it every day.
You can make a few at once in different sizes for gifts or to match rooms. Keep the colors neutral for fall, then swap jewelry for paperclips or loose change if you want a tiny catchall by your desk instead.
Terracotta Folk-Art Bat & Bell Earrings
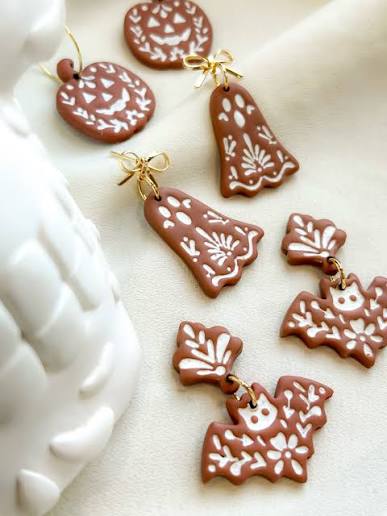
This project gives you Halloween earrings that still look simple and grown up. The warm terracotta polymer clay reads more like fall than costume, and the tiny white folk-art lines keep the bats soft, not spooky.
You need polymer clay, a small rolling tool, cutters or paper templates for bats and bells, a needle tool, white acrylic paint or liquid clay, a fine brush, jump rings, and gold earring hooks. Skill level is intermediate and you can finish a pair in about 1 to 1.5 hours, plus baking time.
Condition the clay well with your hands before you roll it so the bat wings and bell tips do not crack. Roll to an even thickness, press your cutters or trace around simple bat and bell templates, then clean up edges with a blade or needle tool.
Use the needle tool to add small holes wherever you plan to attach jump rings, including between stacked shapes like a round disc and a bat. Put the shapes on tile or parchment and bake by the package directions so they stay strong but not scorched.
Once the pieces cool, paint the white lace details with a tiny brush and a steady hand, or pipe liquid clay for raised lines and bake again. Simple dots, scallops, and short lines work well and are faster than full patterns if you are new to detail work.
Finish with hypoallergenic gold findings to match the warm clay and give the folk-art style a clean look. For easy adapting, swap the bats for only bells or circles if you want everyday fall earrings, or flip to black clay with white paint if you want the same design idea with a bolder Halloween feel.
Painted Clay Pumpkins & Leaves
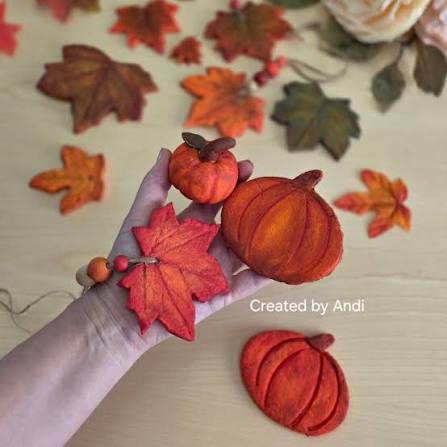
These flat air dry clay pumpkins and leaves are quick to make and easy to reuse every fall. You can tuck them into bowls, tie them on gift bags, or string them into a garland for your mantel.
Roll your clay into an even slab, about the thickness of a cookie. Use leaf and pumpkin cookie cutters or simple cardboard templates so your shapes match and fit together nicely on a garland.
Before the clay dries, use a blunt knife, skewer, or sculpting tool to press in leaf veins and pumpkin ridges. The lines give the paint somewhere to sit and make those soft shadows you see in the photo.
Once dry, brush on diluted acrylic paint in layers of orange, red, and brown. Start light, then add a little darker shade around the edges and in the grooves for that shaded, almost real leaf look.
If you want them as ornaments or tags, poke a small hanging hole with a straw or skewer while the clay is still soft. For bowl fillers or vase toppers, you can skip the holes and keep the edges smooth.
Seal each piece with a matte clear coat so the colors stay clean when kids handle them or when you store them with other decor. One short session makes a whole batch you can turn into garlands, table scatter, or gift toppers all season long.
Cozy Sweater Pumpkin & Acorn Earrings
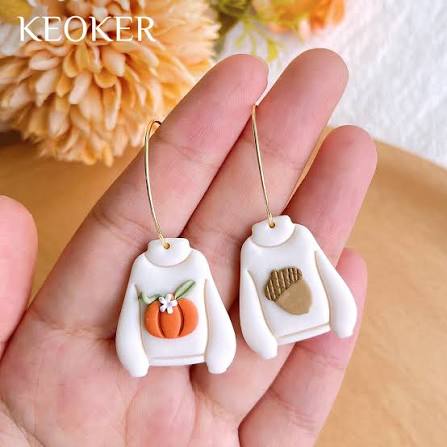
These tiny sweater earrings are a fun way to wear your fall crafts every day. The little pumpkin and acorn details keep them cute for Halloween through Thanksgiving.
This project uses polymer clay, basic cutters, a needle tool, and simple gold hoops or ear wires. Plan on about 1 to 1.5 hours, including baking and cooling, and expect a beginner to low-intermediate skill level.
Start with a flat slab of white clay and cut or hand-cut a simple sweater shape with sleeves. Roll thin clay snakes for the cuffs and neck ribbing, then press them on so the sweater looks more 3D and cozy.
Build the pumpkin and acorn as tiny separate pieces first, using orange and brown clay plus a bit of green for leaves. Press them gently onto the sweater before baking so they bond, but keep the edges crisp so the design still reads clearly from a distance.
Use a needle tool to draw light knit-like lines on the cuffs and hem. This small texture catches light and makes the sweaters look more like real knits in your close-up Pinterest photos.
Add a small hole at the top for jump rings and hoops. If you worry about white clay turning yellow, tent your pieces with foil in the oven and stay within the brand bake time.
Once you like the look, you can swap the motifs to fit your style: tiny ghosts, leaves, or mugs of cocoa all work on the same sweater base, so you get a full set of fall earrings from one simple clay idea.
Pumpkin & Gold Leaf Drop Earrings
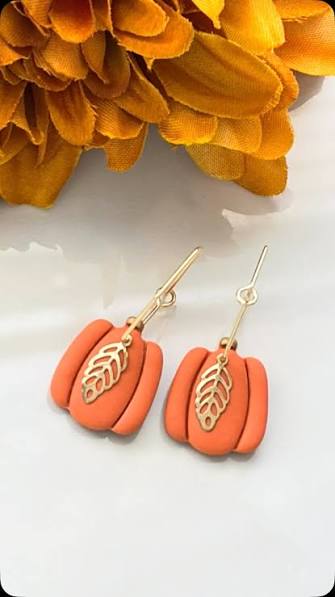
These pumpkin drop earrings are a fast way to try fall polymer clay ideas and end up with something you can actually wear or gift. The cute shape comes from three simple segments, so you do not need cutters or a mold.
Use orange polymer clay, gold leaf charms, and gold earring findings. This project fits beginners and takes about 45 to 60 minutes, plus baking time.
Roll a small log of orange clay, then cut it into three equal bits. Shape each bit into a short rounded log, flatten them a little, then press all three together so they form a plump pumpkin with gentle ridges.
Poke a hole at the top for your jump ring, but keep the clay thinner than it looks so the earrings stay light on your ears. If you like very light earrings, pinch the back a bit more so most of the thickness stays near the edges.
Bake the pumpkins as your clay package says and let them cool. Then glue or attach a small gold leaf charm to the front of each pumpkin and add matching gold hooks so the metal details all tie together.
Change the mood by swapping colors and charms. Try cream clay with copper findings for a neutral look, or deep rust clay with tiny bat or star charms if you want these to lean more Halloween.
Maple Leaf Tealight Clay Holders
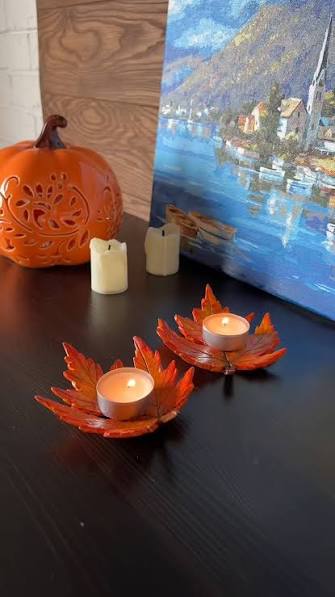
These maple leaf tealight holders are an easy way to add warm fall light to a table, mantel, or small tray. The leaf shape feels seasonal, but the project stays simple enough for a beginner.
Use air dry clay or oven bake clay and roll it about as thick as your pinky so it stays sturdy. Press a real maple leaf or a paper stencil into the clay to trace the outline and lightly carve the veins with a toothpick or blunt skewer.
Shape the leaf like a shallow dish by thickening the center and gently lifting the edges with your fingers. Press a real tealight in its metal cup into the middle to make a flat indent so the candle sits level and does not wobble.
Let air dry clay cure fully, then seal it well with a clear, heat resistant sealer and pair it with LED tealights for safety. Oven bake clay can handle more heat, but LED lights still work best for busy homes or if kids help set the table.
For the color, layer reds, oranges, and a little brown or gold acrylic paint to copy real crunchy leaves. A final coat of glossy varnish gives that shiny, almost translucent look that glows nicely when the candles are on.
Plan about 45 to 60 minutes of hands-on time plus drying or baking. Make a set of two or four in one sitting so you have a full row for a Thanksgiving table or a small gift set you can wrap with a candle included.
Clay Leaf Garland & Pumpkin Set Inspired by Textiles
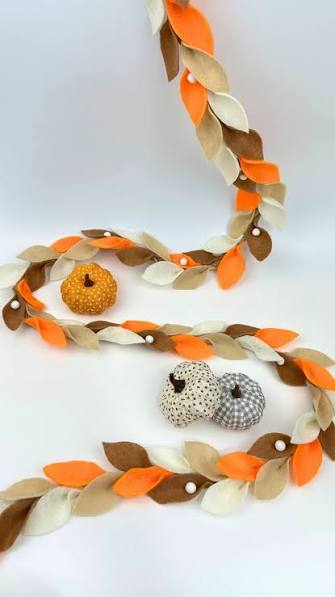
This felt leaf garland and soft pumpkin trio is great color and shape reference for fall air dry clay crafts. You get a ready palette to copy: cream, tan, brown, and a hit of bright orange that always reads as cozy fall on Pinterest.
Turn the leaf garland idea into clay by rolling thin clay slabs, cutting leaf shapes with a cookie cutter or craft knife, then poking a small hole in each before drying. After you seal and paint, you can slide them on twine or attach them with small jump rings for a flexible clay garland that stores flat.
To echo the stuffed pumpkins, make two pinch pots per pumpkin, press the rims together, and smooth the seam so you have a hollow ball. Press gentle grooves from top to bottom with your fingers or a tool to fake the sewn segments, then add a short clay stem on top.
If you like the tiny beads on the felt garland, swap them for small clay dots. Roll pea-size balls, flatten them slightly, poke a threading hole, and dry them so you can space them between your leaves on a banner or bowl filler strand.
Skill level for this set is beginner, and you can finish a small garland and 2 or 3 pumpkins in an afternoon, plus paint time. For a fast win, start with just the leaf shapes in one or two colors, then add more shades and pumpkins as you build your fall clay decor stash.
Egg Carton Toadstool Village on a Wood Slice
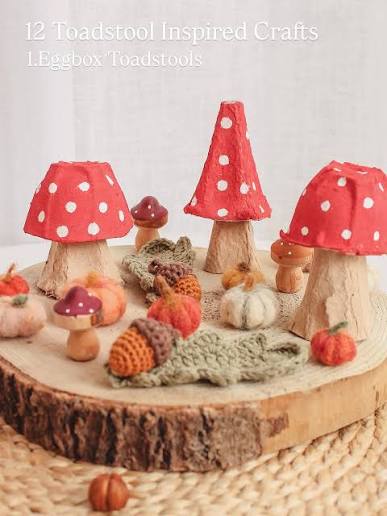
This little mushroom village is a smart way to pull many tiny fall crafts into one finished piece. A thick wood slice frame keeps it neat and makes even simple kid-made bits feel like real decor.
The red spotted caps in the photo use egg carton pieces, but you can swap them for air dry clay or polymer clay toadstools or mini pumpkins. Shape quick domes or cones, press them on a short stem, let them dry, then paint with red, orange, or cream and add white dots.
Skill level is easy, since each piece is small and forgiving. Plan about 1 to 2 hours total, including drying time for paint and glue, so this works well for a weekend craft or a fall playdate.
You only need simple supplies:
- Wood slice or small tray
- Air dry or polymer clay, craft paint, and a small brush
- Scrap yarn, felt, or crochet leaves for extra texture
Keep your color palette tight so the scene feels calm, not messy. Stick to soft reds, oranges, greens, and neutrals like the felt pumpkins and green crochet leaves in the photo.
Cluster your clay pieces close together instead of spreading them out. This makes a stronger centerpiece for a coffee table, entry shelf, or kids room and lets you add new clay mushrooms or pumpkins each fall without starting over.
Kawaii Clay Pumpkins and Ghosts for Easy Halloween Magnets
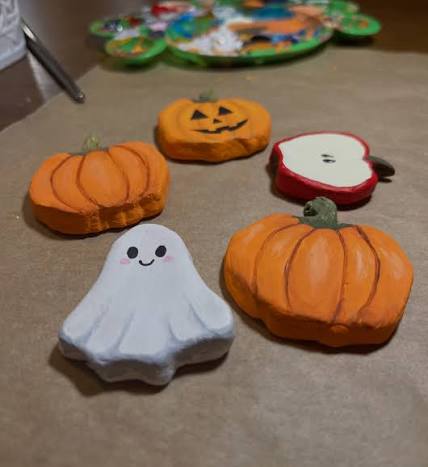
These kawaii pumpkins, ghosts, and apples are great if you want a quick fall clay project kids can finish in an afternoon. The shapes stay flat and chunky, so they dry fast and hold up well on the fridge or a locker.
You only need air dry clay or polymer clay, acrylic paints, a fine brush or paint pen, and small magnets or twine. This project fits beginners, younger kids, and tired adults, and takes about 1 to 2 hours of hands-on time plus drying.
Roll the clay to about cookie thickness, then cut simple outlines with a plastic knife or a small cookie cutter. Think basic pumpkin ovals, a rounded ghost with wavy bottom, or an apple slice like the one in the photo.
Keep edges soft with your fingers and press in light lines for pumpkin segments while the clay is still soft. Flat shapes crack less, and kids can press them without breaking small parts.
Let the pieces dry fully before you paint. Dry clay takes color better, and the acrylic paint will not smear or peel when little hands touch it.
Use bright orange, white, and red for a kid-friendly look, and then add kawaii faces with a fine liner brush or a black paint pen. Small blush dots and tiny smiles make even “spooky” ghosts look cute instead of scary.
Turn them into useful pieces at the end. Press a small hole at the top before drying for ornaments and gift tags, or glue flat magnets to the back for easy Halloween fridge art.
Terracotta Lantern Cones and Rings for Cozy Fall Gardens
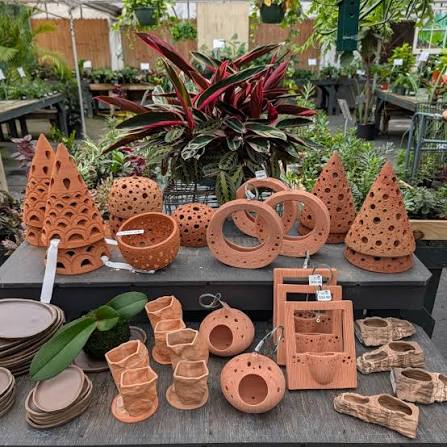
These perforated terracotta cones and rings are great inspiration if you love clay pot fall crafts but want something a little more sculptural. The warm, unglazed clay glows nicely on cool autumn nights when you tuck a candle or string lights inside.
Skill-wise, this fits a beginner to intermediate clay crafter. Simple cone and ring shapes are easy, but you do need patience to cut neat holes before the clay dries.
For materials, you only need clay (terracotta clay or terracotta colored air dry), a craft knife or straw for holes, a clay-safe drill bit for fired pots, and a breathable outdoor sealant if the piece will live outside. Plain store terracotta pots also work if you want to drill cutouts instead of sculpting from scratch.
Plan about 1 to 2 hours of hands-on time per lantern, plus drying or firing time. Start with one cone or bowl to test your pattern before you make a whole group.
Copy the look by using simple repeating shapes instead of tiny detailed carvings. Circles, triangles, and half moons are easy to punch in rows and still look very polished when the light shines through.
You can stack rings and tubes around a glass candle holder to build a tall lantern tower or a plant stand. Keep pieces modular so you can swap them between candles and small fall planters as you change your decor.
If you keep these outside for fall, seal the dry clay with a thin, breathable outdoor sealer so rain and early frost do not crack your work. Group three or five lanterns together near a bench or door to make a cozy glow path for Halloween and harvest nights.
Miniature Polymer Clay Autumn Forest on a Wood Slice
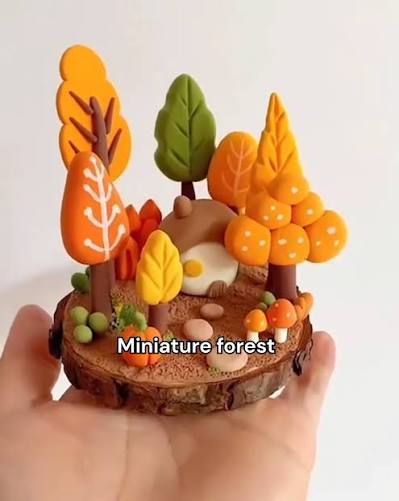
This tiny autumn forest is a great first polymer clay or air dry clay scene if you want something giftable and easy to store. The small wood slice base keeps the project fast, and the finished piece looks cute on a shelf, desk, or kids room.
Skill level stays beginner friendly because each tree is just a tapered cylinder trunk with a flat leaf top. You can press in simple white lines or dots for veins instead of sculpting every leaf.
For materials, you only need a wood slice, a few fall clay colors, strong craft glue, and a basic clay tool or toothpick. Plan on about 1 to 2 hours of hands-on time, plus baking or drying time.
Work in small batches so pieces keep their shape. Make trees, mushrooms, stones, and any little house or hill as separate pieces, then bake or let them dry before you glue them to the wood slice.
To keep the scene calm and tidy, stick to a short palette: orange, yellow, brown, and one green. Repeat those same colors on trees, mushrooms, and pebbles so the eye reads it as one tiny forest, not a random mix.
If you want a Halloween twist, swap one tree for a simple clay ghost, add a tiny pumpkin near the house, or paint small black bats on the tree canopies. Use this same method on bigger slices to make a mini fairy-garden set for a mantel or kids play shelf.
Pumpkin-Inspired Candle Tray for Cozy Fall Nights
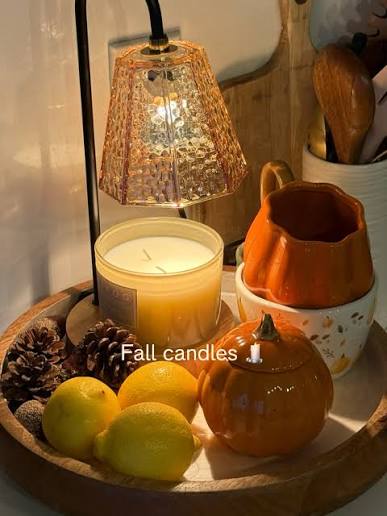
This project makes a low pumpkin clay tray or a set of tiny pumpkin clay candle cups that you can group on a wood board or tray for a warm fall corner. The skill level is beginner, and you can finish the shaping in about 30 minutes, then add drying or baking time.
Use air dry clay or polymer clay, a simple round cookie cutter, and a blunt tool to press pumpkin grooves around the edge. Add a shallow dip in the middle for a tealight, or build small cup shapes that echo the pumpkin-shaped ceramics you might already use in fall displays.
This idea works well because the tray keeps matches, small candles, and pinecones together so the space looks neat and cozy, not messy. A tight color palette of wood, cream, and orange helps the whole vignette feel calm and easy on the eyes.
Style your clay pieces on a round wooden tray with one jar candle, a few pinecones, and maybe a pumpkin mug for hot drinks. Skip fresh fruit and use clay pumpkins or faux fruit instead so you can pull this tray out every year without worrying about spoilage.
For a quick finish, brush on watered-down acrylic paint in soft orange or terracotta and seal with a clear matte varnish. If you use real flame, keep wicks short and leave a little bare wood edge so the tray stays safe and practical for nightly use.
Conclusion
Pick your first project based on what you already have on hand. If you have air dry clay, start with pumpkins, leaf dishes, ghost figurines, or simple magnets that kids can help paint.
If you like polymer clay, the earrings, tiny forests, and mini pumpkins give you quick wins you can wear or gift. Short on time but want decor fast? Go for flat shapes like leaves, tags, and magnets that you can roll, cut, and paint in one afternoon.
Save the bigger builds, like lantern cones or garden toadstools, for a slower weekend when you can enjoy the process. Open your clay stash, choose one project that matches your skill and schedule, and make a small batch so you have extras to gift or tuck into fall corners around your home.