When finishing your bathroom, the installation of a bathroom sink vessel drain is important. Though these sleek lavatories tend to be fancy-looking, they come with a few issues that must be fixed. In most cases, there is no overflow drain because they rest on top of the kitchen cabinet.
This might be a problem if you have a system for filling up your sink bowl with water. In most bathroom sinks, proper drainage is enabled through a pop-up drain which is linked to an overflow.
The absence of this feature in a vessel sink means that a special kind of drain system is required which does not need an overflow hookup. The sink should be emptied quickly and neatly through the main drain without leaving any mess behind.
6 Steps to Install a Vessel Sink Drain without Overflow
In general, any bathroom will look great with one of these types of sinks installed. But they are absent in many vessel bowls because it can be an unpleasant sight when there is an overflow. With the right skills and tools, it is easy to install a vessel sink without overflow.
Required tools:
- Pop-up drain
- Putty gun or knife
- Silicone waterproof putty
- P-trap
- Pencil or chalk
- Hacksaw
- Wrench
- Plumbers glue
- Leveling tool
- Mounting ring (optional)
PS: Your water should first be stopped at the main source if you are going to make any plumbing fittings.
Step 1: Select the Appropriate Drain.
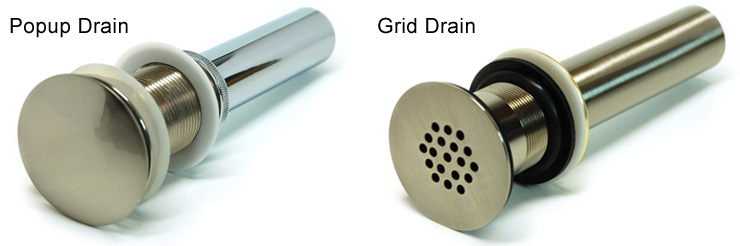
The installation of a vessel sink drain with no overflow for your bathroom begins with the appropriate drain. The best option is pop-up drains because you can easily plug or unplug them as required. Another good option is grid drains, but the holes have to be big enough to allow fast drainage.
If the plugging feature is important to you, then you might go with the pop-up drain because grid drains have no plugs. No lever is needed for a soft-touch pop-up drain as it can be opened or closed by simply clamping down on the surface of the drain.
Pop-up drains are not linked to the overflow and so their plumbing lines are shorter. An advantage of the shorter pipeline is that it allows proper drainage. In the absence of an overflow drain, this feature is important.
Step 2: Set Your Sink in Place
Following the pattern of the drain holes, line up your vanity sink below. Use a piece of chalk or a pencil to mark edges, creating a visual guide for yourself. Turn the vessel to the other side and coat the bottom edge with a blob of waterproof silicone putty.
Place the vessel sink again, against the vanity drain hole, following the guidelines of the previous marks. Spend a few more minutes making sure that both holes align perfectly before the silicone putty becomes dry.
Do not wipe any excess caulk oozing out of the edge until it dries. You can peel it away easily with a putty knife when it is time to install it.
Use your leveling tool to ensure that the vessel sink lies evenly against the flat surface. Adjust it as required before the caulk dries.
Do not proceed to the next step until the silicone caulk is completely dry.
Note: In the case of glass vessel sinks, a mounting ring is required before caulking. The mounting ring will enable proper alignment of the sink bottom with the cabinet under since some glass sinks are handmade and their bottoms tend to be uneven. After the mounting ring has been installed, you can go ahead and put the sink in place following the guide above.
Step 3: Insert Drain
It is common for sinks to come with assemblies and drains that are peculiar to that specific model. But in some cases, you may need another drain which you have to buy separately.
In the absence of an overflow drain in a vessel sink, there should be no link to a separate exit when you install the main drain. The absence of this additional component can ensure a fast and easy installation if you are installing the appropriate drain.
Coat the drain hole with a bead of waterproof sealant. Thread the drain into the vanity below from the vessel sink, using the right drain model. The drain should rest in the hole with a snug fit. You should use a generous amount of sealant to ensure that the drain is fixed and sealed completely.
Right under your vanity also, your other mechanisms including rubber gaskets should fit firmly to the bottom of the sink. Avoid overtightening the drain because it can lead to complications or even cracks if the vessel sink is made out of materials like ceramic or glass.
Step 4: Install Faucet and Handles.
During sink installation, the usual practice is to install the faucet on its own without the sink bowl. But the drainage system below remains attached to the spigot and its handle.
At this point, you are to install the faucet as instructed by the manufacturer, whether it is a single-lever faucet or a double-handled one. Make sure that the hot and cold lines are correctly attached to the appropriate handles. Use as much sealant as necessary in order to prevent any eventual seepage or leaks.
Step 5: Link the Drain to the Plumbing Pipes Below the Vanity.
In the process of installing your bathroom vessel sink, your drain has to eventually be connected to the sink bowl.
Go ahead and look below the vanity after you have installed the upper part of the drain securely. If you find the drain pipe too long compared to the space under the vanity, you can reduce the length using your hacksaw.
The pipe that extends from the bottom of the drain should be connected to a P-trap. Thread each pipe at the end so that they easily screw one onto another.
Join the other end of the P-trap to the main pipe which is attached to your wall. Make these two ends waterproof and airtight using your plumber’s glue.
You can as well secure each item tightly using your wrench. However, avoid overtightening as this can lead to cracks and leaks.
Last Step
Turn the water on at the primary source and look out for problems above and below the sink, such as leaks. Fill the sink and let it drain completely, to examine it. The water is expected to drain out fast with no delay.

Conclusion
As long as you have a proper understanding of the task, it is very easy to install a vessel sink drain with no overflow. In the absence of that extra feature, you should use a special drain with a shorter plumbing side. A sink that has no overflow will require fast and total drainage.
Grid drains cannot be stoppered so while they can work, they may not be convenient. On the other hand, you can fill your sink when necessary if you use pop-up drains. You should be careful with this extra feature because it can create a mess if your sink becomes overfilled. With a soft-touch pop-up drain, you can open the drain quickly in the event of an emergency that requires you to empty the sink.
Installing vessel sink drain without overflow is very easy when you have the appropriate tools. Vessel sinks are usually set on top of a vanity, which is why you will find that during installation, they are convenient to work with, especially in the absence of an overflow.
More from Materialsix.com: